Christmas Cracker - A Free Quilt Block Tutorial
Season's Greetings! I have a fun, festive quilt block tutorial to share with you today - a Christmas Cracker! I've used leftover 5" charm squares, but jelly roll strips are ideal, or anything you can cut a long enough 2.5" strip from. It's pretty quick too - which is lucky, since Christmas is not far away... so let's get to it!

For a single block you will need:
Use a quarter inch seam allowance, unless specified otherwise.
Start by pressing your fabric to remove all creases. Use a little steam or spray starch, and be careful not to distort the fabric. Allow to cool.
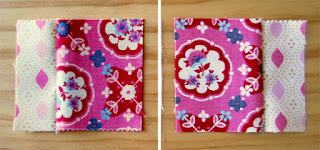
Cut one charm square (Fabric A) into two rectangles, 2.5" x 5", then from one of these cut one piece, 2.5" x 4.5", and from the other cut two pieces, 2.5" x 2.25".
Cut the other charm square (Fabric B) into two rectangles, 2.5" x 5". From these cut a total of six rectangles, 2.5" x 1.25".
From your 2.5" background fabric strip, cross-cut 4 pieces, 1" x 2.5". Cross-cut these into two squares each, 1" x 1", for a total of 8 squares. Set the rest of the background fabric aside for now.

Draw a diagonal line, corner to corner, across the back of each of your 1" background squares. This will be your sewing line.

Lay out your pieces as shown, making sure you have the 2.25" Fabric A rectangles oriented the correct way, with the 2.25" edge running left to right.

Sew each end Fabric B piece to its adjacent Fabric A 2.25" piece. Press seams to Fabric A.
Place a square on the corners of the four inner Fabric B pieces, face down, as shown. Pay careful attention to the direction of the sewing lines.

Making sure edges are flush, sew along the sewing lines a smidgen to the seam allowance side of the line (i.e. the outside corner of the square).

Press to set seams. Finger press open, pressing the seams in two of the units (one from each side of the cracker) towards the background fabric, and the other two units to Fabric B. When pressing seams to the background, your corners and edges should all line up:

When pressing to Fabric B, your background should neatly replace the corners of Fabric B. In both cases you should end up with a neat 2.5" x 1.25" rectangle.
When you're sure everything lines up, press seams with your iron - being careful of your fingers with the small pieces. Trim seam allowances to a quarter inch.

Now you will have two pairs, the back of which should look like this:

Sew each pair together, nesting the seams where they meet. You should be able to feel them 'lock' together.

Press seams to one side - whichever side sits nicest. Lay out your pieces again as shown:

Sew the pieces together to finish the cracker, pressing seams to Fabric A.

And from the back:

To finish the block, make sure your cracker is freshly pressed and cooled and measure the length (i.e. the longest side). It should be 12.5".
From your 2.5" background strip, cross-cut cut two rectangles the length of your cracker.
Pinning at the centre, quarter way points and each end, sew a background strip to the top, and one to the bottom of your cracker. Press seams to the background.

Congratulations, you've finished your block!
Note: When complete, block should measure 12.5" x 6.5" (including seam allowance all round). If you want a border all round, rather than just the top and bottom, you will need two more pieces, 6.5" x 2.5", for each end. Depending on how long your 2.5" strip is, you may need more background fabric.
If you make something from this tutorial, I'd love to see it! Add a link in the comments, send me an email, or tag me on Instagram (@hopetn). You can see what I did with my block here. Also have a look at this beautiful hour basket by @craftaholickat on Instagram, here.
Happy sewing!
Hope x

For a single block you will need:
- 2 coordinating, 5" charm squares - these will be Fabric A (the largest pieces of the cracker) and Fabric B (the smaller pieces of the cracker);
- 2.5" x WOF strip background fabric
Use a quarter inch seam allowance, unless specified otherwise.Start by pressing your fabric to remove all creases. Use a little steam or spray starch, and be careful not to distort the fabric. Allow to cool.
Cut one charm square (Fabric A) into two rectangles, 2.5" x 5", then from one of these cut one piece, 2.5" x 4.5", and from the other cut two pieces, 2.5" x 2.25".
Cut the other charm square (Fabric B) into two rectangles, 2.5" x 5". From these cut a total of six rectangles, 2.5" x 1.25".
From your 2.5" background fabric strip, cross-cut 4 pieces, 1" x 2.5". Cross-cut these into two squares each, 1" x 1", for a total of 8 squares. Set the rest of the background fabric aside for now.

Draw a diagonal line, corner to corner, across the back of each of your 1" background squares. This will be your sewing line.
Lay out your pieces as shown, making sure you have the 2.25" Fabric A rectangles oriented the correct way, with the 2.25" edge running left to right.
Sew each end Fabric B piece to its adjacent Fabric A 2.25" piece. Press seams to Fabric A.

Place a square on the corners of the four inner Fabric B pieces, face down, as shown. Pay careful attention to the direction of the sewing lines.
Making sure edges are flush, sew along the sewing lines a smidgen to the seam allowance side of the line (i.e. the outside corner of the square).

Press to set seams. Finger press open, pressing the seams in two of the units (one from each side of the cracker) towards the background fabric, and the other two units to Fabric B. When pressing seams to the background, your corners and edges should all line up:

When pressing to Fabric B, your background should neatly replace the corners of Fabric B. In both cases you should end up with a neat 2.5" x 1.25" rectangle.
When you're sure everything lines up, press seams with your iron - being careful of your fingers with the small pieces. Trim seam allowances to a quarter inch.

Now you will have two pairs, the back of which should look like this:
Sew each pair together, nesting the seams where they meet. You should be able to feel them 'lock' together.

Press seams to one side - whichever side sits nicest. Lay out your pieces again as shown:
Sew the pieces together to finish the cracker, pressing seams to Fabric A.
And from the back:
To finish the block, make sure your cracker is freshly pressed and cooled and measure the length (i.e. the longest side). It should be 12.5".
From your 2.5" background strip, cross-cut cut two rectangles the length of your cracker.
Pinning at the centre, quarter way points and each end, sew a background strip to the top, and one to the bottom of your cracker. Press seams to the background.
Congratulations, you've finished your block!
Note: When complete, block should measure 12.5" x 6.5" (including seam allowance all round). If you want a border all round, rather than just the top and bottom, you will need two more pieces, 6.5" x 2.5", for each end. Depending on how long your 2.5" strip is, you may need more background fabric.
Happy sewing!
Hope x


This is so cute! Perfect for our Irish side of the family.
ReplyDeleteThanks very much! Are Christmas Crackers a big tradition in Ireland? I know little of their history, just that we used to have them every Christmas. :)
DeleteTHis is a lovely block, and such a clear tutorial!
ReplyDeleteThank you so much Sandra! I really had fun designing it - and making it of course. I'm glad the tutorial is clear, thanks very much for the feedback. :)
DeleteI love this! It really looks just like a Christmas cracker! Thank you for sharing. :)
ReplyDeleteThanks Anita! I spent a bit of time looking at Christmas crackers once I had the idea, just to make sure I got it right... :)
DeletePretty block! My computer died a few days ago, so I only have my phone to check emails. Is there a way to download this design from a phone? I know how to do it on the computer but not on the phone....
ReplyDeleteThank you. I'm sorry, I've only just seen your comment! A bit late now, I know, but I'm afraid I don't know how to download on a phone. I would just pull up the blog post and use it straight from that, or else take screen shots if needed offline.
Delete